Thursday, September 2, 2010

W.Workshop in a Nutshell (Day 1)

When I was Little by Jamie Lee Curtis (Option 1 - younger grades)
All the Places to Love by Patricia Maclachlan (Option 2 - older grades)


Basic Outline:
• I gather students at the rug and introduce the writing block. I tell them that for the rest of the year they will spend time writing each day – it will become our favorite part of the day. Just like the authors of all of the books on our bookshelves, THEY will become authors!
• I then share a favorite book to launch the mini-lesson. My favorites are: “When I Was Little” by Jamie Lee Curtis (I talk about how they are growing up and already have a lot of memories and fun experiences they can write about) OR “All the Places to Love” by Patricia Maclachlan (we talk about things we love; people, places, hobbies, activities, etc .)
• On a piece of chart paper I draw a web and model writing my name in the center. I explain that I am going to brainstorm things that I could write about. In one circle I write/draw about family and friends. In another I write/draw about my favorite places and in another my favorite hobbies. In yet another, I write/draw about items that are important to me (my running shoes, a stuffed bear, my scrapbooks) and in another I draw a bandaid and write about “boo boo’s” I’ve had (stitches, broken bones, etc). In the final circle I draw/write about the culture of living in my family. For example; if you were in my family you’d have to be a basketball fanatic (GO JAZZ!), and love watching Nascar. You’d also have to like scones because we make them every Sunday.
• When I use All the Places to Love, I do a heart map instead of a web. It is a photocopy of a big heart and the students record important things inside it – people they love, places they love, sports they love, things the love to do, music they love, etc. (same concept as the web, just a different format). This idea comes from "Lessons That Change Writer's" by Nancy Atwell.
• I send students back to their desks with their own web (or heart map). The students spend the last 10 minutes or so filling out their own web. I walk around and put star stickers on the papers of those who are busy writing and help those who seem to be stuck. It is really important at the beginning to set up management with a lot of positive praise and feedback. I really stick to the expectation that students are quietly writing (NO TALKING!). I tell the students that during writing time the only thing I should hear are their pencils scratching the paper.
• As the block comes to an end, I introduce the students to their writing folder and teach them how to store their work and put the folders away each day.

Thursday, August 19, 2010

First Days of School

Here are a few fun ideas that you can use as fillers during these first few days/weeks of school.

TIME CAPSULE

Have each child bring a Pringles can and decorate the outside, creating a time capsule. They can then fill the time capsule with a handwriting sample, a tracing of their hand, a piece of string that's as tall as they are, a self portrait (or actual picture), a list of their favorite things (favorite music, movies, sports, hobbies) etc. The kids then seal their time capsules and "bury" them somewhere (which might be just in a cupboard in the classroom). Time capsules can then be opened at the end of the school year. You could also just have a single class time capsule and just have the students put one thing in it (such as a letter to themselves or an "All About Me" sheet. That way you only have to deal with one time capsule instead of 25.

CLASS QUILT

Give each child a square sheet of white paper (5x5, or 8x8) and have them decorate it with their name, drawings of their family, drawings of their favorite things, etc. Punch a hole in the corners of each sheet of paper and then tie the papers together with yarn to create a large class quilt that can be displayed in the classroom or hallway. The teacher would want to model how to do this or create a quilt square prior to the lesson. A fun story that goes along with this is "The Rag Coat" by Lauren Mills. It is in the 4th grade literacy place book "Chapter by Chapter" if you need a copy.

SUMMER REFLECTIONS OR SHADES OF SUMMER

This is an easy activity that students enjoy doing, which also serves as a chance for the teacher to get a quick indication of students' writing abilities.
Each student draws a large pair of sunglasses. In the sunglasses, the student draws something he or she did over the summer...a trip, activity, etc. They then attach a paragraph about what is reflected in the sunglasses. This is an opportunity to get an early writing sample and also makes an instant bulletin board! You could also do the same thing using a picture of a windowpane and call it "View From My Window".

ME Bags or Boxes

A tried and true lesson idea for the first days of school is to put items in a bag or box that represent you (the teacher). For example, a picture of your family, a pair of running shoes because you like to run, a whisk because you like to cook, etc. You can then send home a small bag or box with each student and have them fill it with their favorite things. Throughout the rest of the week you let students take turns sharing their "ME" boxes.

Sticker Partners

Each student is given a sticker to put on his or her hand upon entering the classroom, but students aren't told what the sticker is for until the time is right! Be sure there is a partner (matching sticker) for every student. Ask students to find their partners and interview them (name, grade, hobbies, etc.). Each interviewer is responsible for introducing each interviewee to the rest of the class. You might find that students find it less threatening when someone else shares information about them than when they are asked to share about themselves.

Paper Dolls!
Cut out paper doll shapes from cardstock. All are alike in the beginning. Then students "dress" their dolls by coloring or making clothes out of fabric, wallpaper, etc. Tell them to leave the face portion blank. Use the digital camera to take pictures of the students. Crop the pictures so that you see only faces, blow them up to fit the paper dolls, cut them out and glue them on. Students and parents love them! At the end of the year, students take their dolls home.

The Me Shield
For this activity, we use a copy of a banner from a Red Cross education program, drawn like a shield and divided into four sections. We pose seven questions students can answer about themselves:

What are three things you are good at?
What do you like most about your family?
What do your friends like about you?
What do you think you can do better than almost anyone else your age?
What do you dream about doing one day?
What is something you have already done that makes you feel really good?
What is one thing you are planning to change about yourself so you will be even better?
Each student writes his or her name at the top of the paper and answers four of the seven questions, one answer per section, on the banner. Students can write their answers or use a combination of art and writing to express themselves. The students volunteer to share their banners, and the teacher can proudly display them after the students have had a chance to decorate them.

Brag, Brag, Brag!

The first day of school is fast approaching. You have all worked so hard to get your rooms up and ready. I am SO PROUD! I wanted to post pictures of your rooms here for two reasons. First, so that you will be able to look back at the end of the year and remember what your room looked like before the kids "invaded" it (while everything is still so nice and organized), and second so that we can share your great ideas with others.


Monday, April 26, 2010

Summer Things To Think About

It was so much fun to meet with you yesterday. I am looking forward to working with all of you and have been so impressed with your excitement and enthusiasm. 2010-2011 is going to be a GREAT school year!
Here are some pictures that might be helpful as you begin to plan how to organize and set up your classroom this summer. If you are wondering about any other aspects of classroom setup, please let me know.
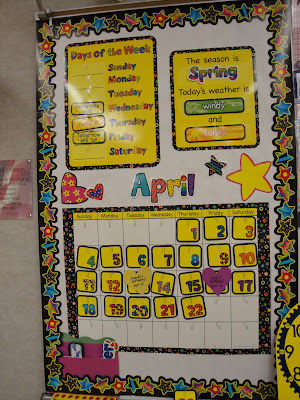
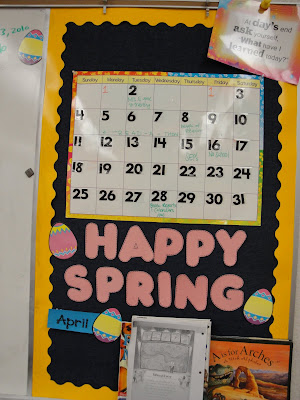
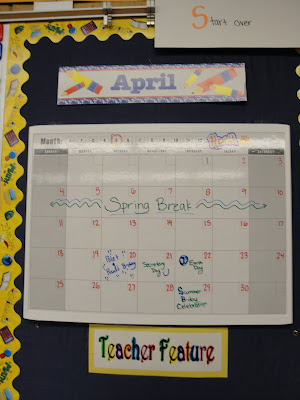
CALENDAR
You will want to have a daily calendar posted somewhere in your classroom. You can purchase these premade as shown in this first picture from a second grade classroom, or make your own as shown in the second picture.


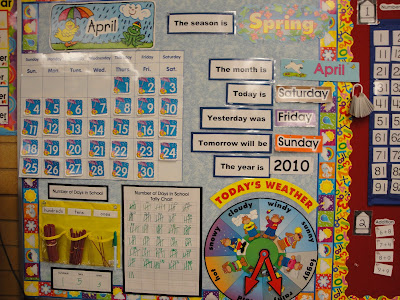
In the younger grades, some teachers spend time each day doing calendar activities and have a more elaborate calendar set up as seen in this picture from a first grade classroom.

In the upper grades, a simple calendar with basic daily information posted on it is sufficient. This sixth grade teacher uses a wipe-off white board calendar she found at Wal-Mart.

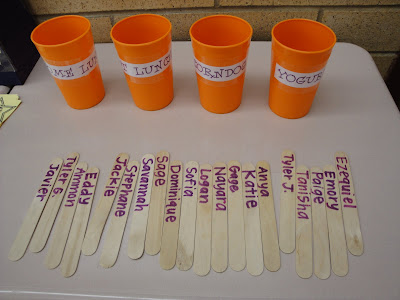
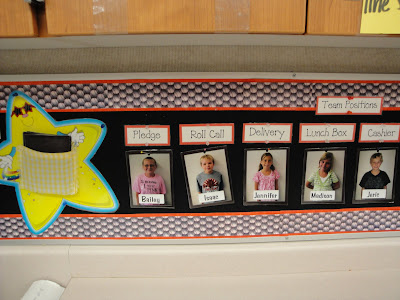
ROLL CALL and LUNCH COUNT SYSTEM
Each day in your class you will be calling roll and taking a lunch count. There are several creative ways to organize this. In this picture, a second grade teacher uses sticks and plastic cups. Each day upon arriving at school, students put their sticks in the appropriate cup to indicate what they are having for lunch.

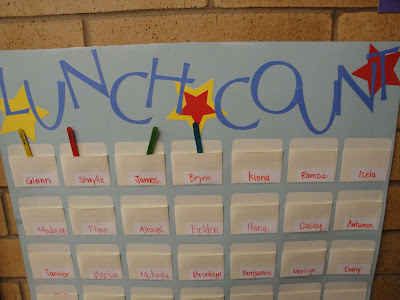
Some teachers use a chart as shown in this picture. Students put a colored stick (red for home lunch, green for school lunch, yellow for corndog, etc.) in a pocket with their name on it.

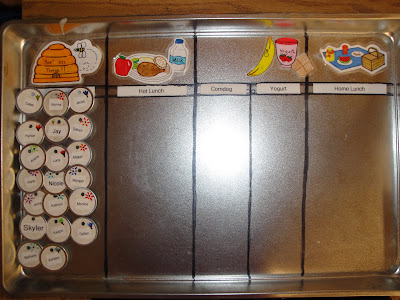
Other teachers use a metal cookie sheet with magnets. Students move their magnet to indicate their lunch preference for the day.
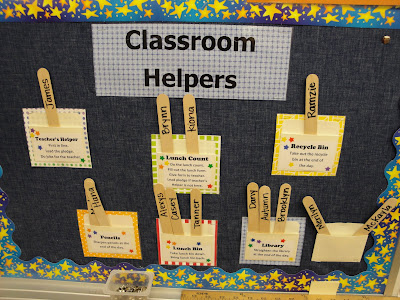
CLASS HELPER BOARD
In your classroom, you will want to set up a system for having the students help you with basic classroom chores. Here are a couple of ways to organize that. This teacher takes a picture of each of her students on the first day of school (each grade level team has a digital camera to share) and then laminates the pictures. This board indicates the different classroom jobs and the teacher simply hangs the picture of the student underneath the job they are doing that week. Extra pictures are placed in a pocket that is kept to the side.

Here is another example where the teacher uses library pockets and craft sticks.
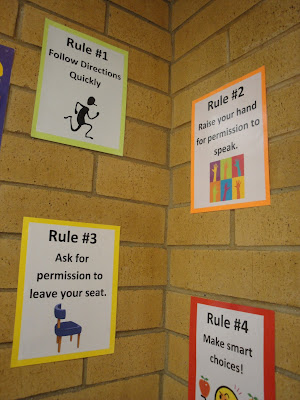
RULES & PROCEDURES
You will want to post your classroom rules in a prominent place in your classroom. Here are several examples of posted classroom rules.


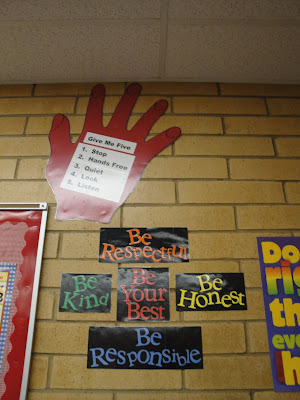
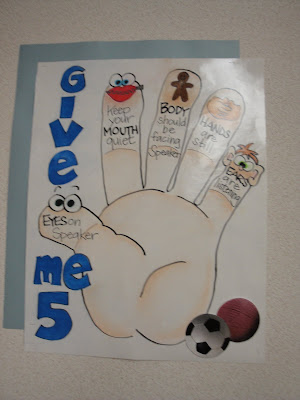
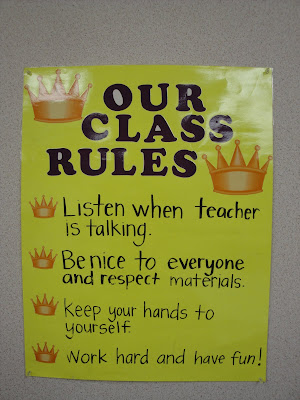
Another great idea I have seen is to post procedures around the room. For example; post the rules for sharpening pencils by the pencil sharpener. Procedures for getting drinks by the drinking fountain. Rules for lining up and walking down the hall by the door.
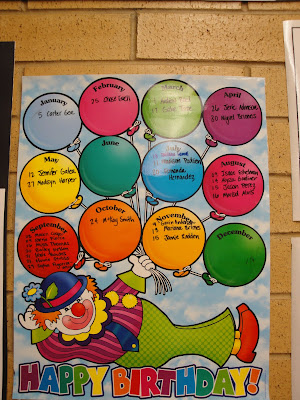
BIRTHDAYS
Most teachers post something in their classroom indicating student birthdays. This could be done right on the calendar, or on a separate chart or bulletin board hanging somewhere in the room. When you meet with your grade level teams, ask them what they normally do to celebrate student birthdays.
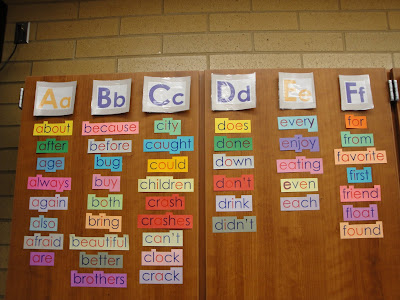
WORD WALL
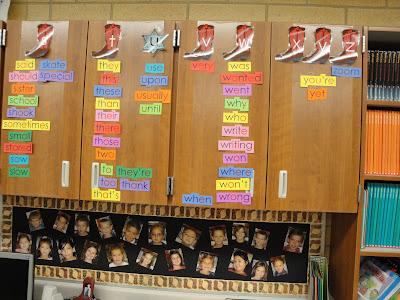
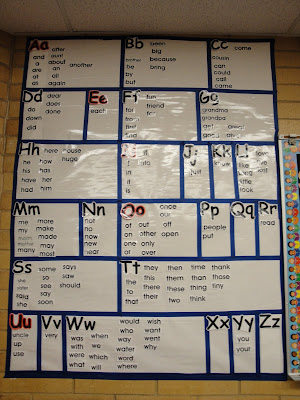
Our district encourages teachers to create and maintain a Word Wall that displays high frequency words, words that are tricky to spell, or grade level vocabulary words. You will want to think about creating some type of Word Wall in your classroom. These can be as simple as die cut or computer printed letters as seen in this picture.

In this picture, the teacher created her word wall to match the cowboy theme of her classroom decor. She uploaded cowboy clip art in to Word, typed the letters on top and printed them on card stock on a colored printer.

You can also purchase complete Word Wall sets from educational supply stores that are premade.

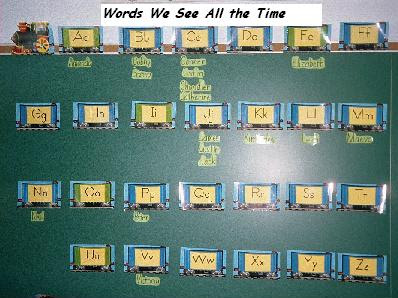
Most teachers in our building hang their word wall on the cupboards, but here is an example of a teacher who posts her word wall in a separate area.
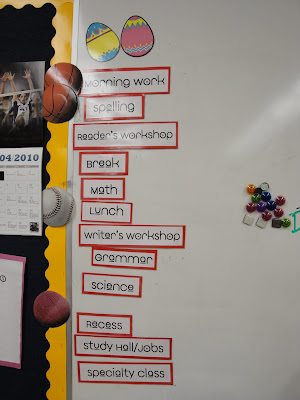
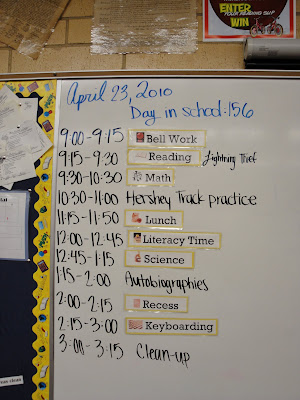
DAILY SCHEDULE
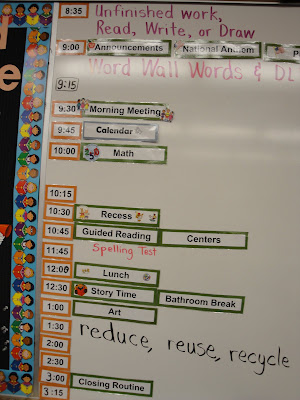
You will want to post your daily schedule somewhere at the front of the room. Most teachers create magnetic word strips that list all of the days activities. These magnetic strips can be hung up or taken down depending on the schedule for that day. Here are a couple of examples.


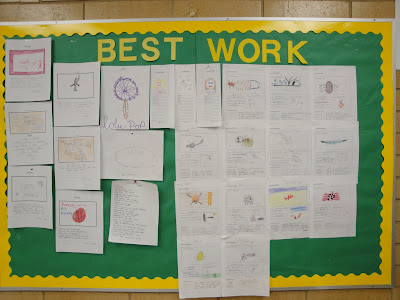
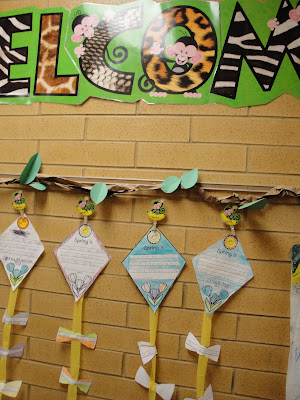
DISPLAYING STUDENT WORK
Creating an area in your room or in the hallway to display student work throughout the year is a great idea. The display can stay up all year and the only thing that changes is the student work you hang there. Here is a very simple example of a student work bulletin board.

Here, another teacher created a wall display outside the room with student names listed on clothespins. Student work could easily be hung up or taken down from the clips throughout the year and her display matched her jungle theme.

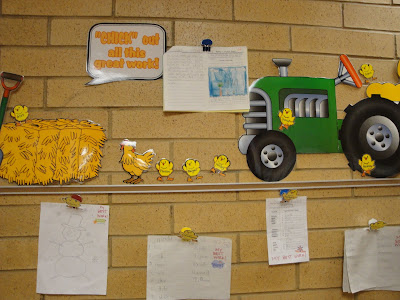
Here is another teacher with a similar display that matched her farm theme.


CONTENT AREA BULLETIN BOARDS
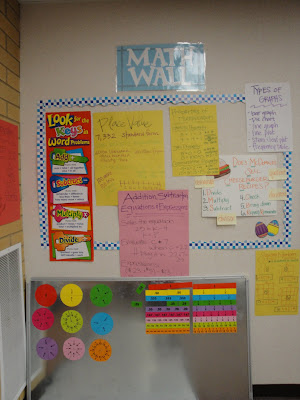
Most teachers create bulletin boards or wall displays that relate to the content they are teaching. Here are a few examples. This teacher created a math wall where pertinent information about math is displayed. This information displayed on the board changes depending upon the unit the class is studying.

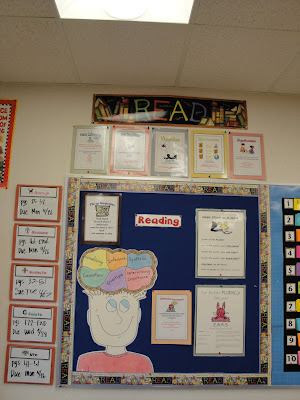
Here a teacher has created a working bulletin board for reading. Notice the small whiteboards to the left of the bulletin board. These boards contain the assignments for guided reading groups.

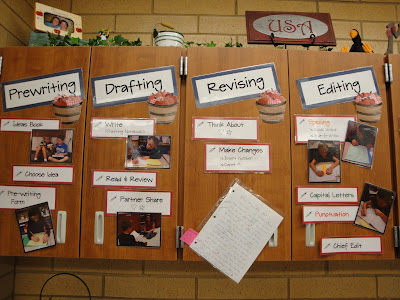
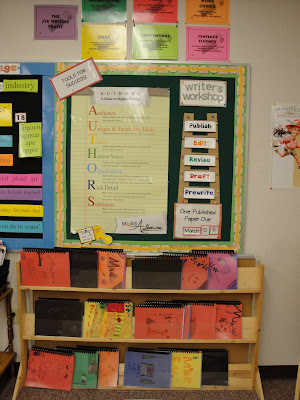
Here are some examples of bulletin boards/displays related to writing instruction. Notice on this writing display that the teacher took pictures of actual students in her class behaving appropriately and doing each step in the writing process. She then hung these pictures up to remind students exactly what they should be doing during writers workshop.
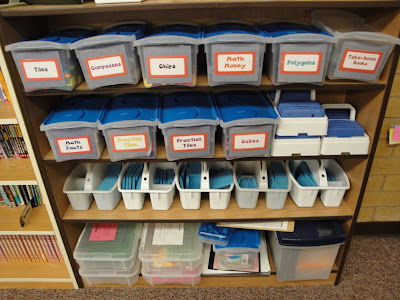
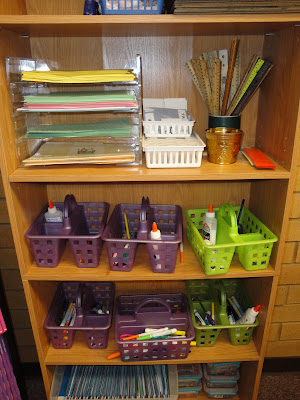


WORK AREAS
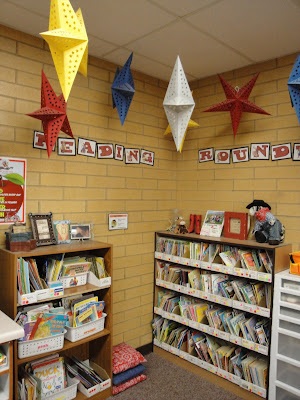
It is a good idea to plan for a reading area/nook in your classroom. You can decorate it or keep it simple.

Other teachers have writing areas or areas where they keep math materials in easy reach of students.


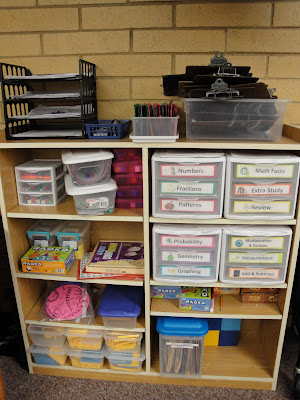
I love how this teacher keeps student supplies in plastic containers. When students are working on projects and need materials such as markers, colored pencils, scissors, or glue, they can bring one of these containers to their table.
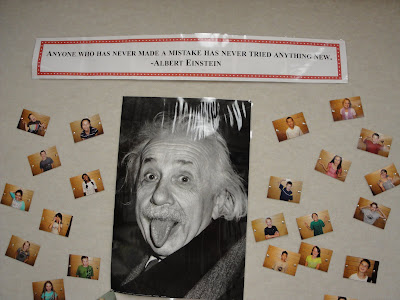
JUST FOR FUN
You could also think about doing a display in your classroom that is fun and showcases something about the students. I wanted to share this wall display of a 6th grade intern. To go along with her classroom theme, she hung a picture of Einstein and then had all of the students mock his pose in a photograph. This has been hanging in the classroom all year and is a favorite of everyone who visits her classroom.